The first few leaves of the spinach plants where harvested today. The spinach plants are looking quite nice. It is interesting that only two of the lettuce seeds sprouted. This exactly opposite of what happened last year. I had only two spinach and lots of lettuce. The greenhouse seems to be working well since I didn't harvest my lettuce last year until a few weeks from how if I remember right.
Looking at the temperatures records for the last couple of days the temperature inside the greenhouse ranged from a low of 31 to a high of 90 while the outside temperature ranged from 21 to 50 degrees Fahrenheit. This is an improvement over the last fall when the minimum temperature difference was only 5 degrees, no it is up to 10. Now I need to worry about seeing if we can keep it from getting to hot since summer is on it's way.
Showing posts with label Greenhouse #2. Show all posts
Showing posts with label Greenhouse #2. Show all posts
Tuesday, April 1, 2008

Sunday, March 2, 2008
New Life


 I planted spinach and lettuce on the Tuesday before last. I don't see any of the lettuce yet but the spinach is coming along nicely. There are quite a few as you can see from the picture below. The other picture is the basil that I hope to move into the greenhouse when it stops getting so cold at night.
Sunday, February 10, 2008
Double Glazing
This past weekend I finally figured out how to put a second layer of glazing on my greenhouse. The spacing between the layers is about 1 inch but some of the separation isn't that consistent. Looking at the temperature data for the last 24 hours the difference between the inside and outside was at least 2 degrees Fahrenheit and at most about 20 with a maximum inside temperature of 70 and a minimum outside temperature of 30. The only other solar features that could affect the temperature inside was a 30 gallon green garbage can full of water. Hopefully tomorrow I will be turning the air circulation back on if I finish getting the ground tilled.

Here's how I put the double glazing on.
I nailed 3 - 1 3/4 thick boards along the length of the green house. One at the peak, front top edge and front near the ground. In each of these I drilled holes for a 1 inch pipe to set in. This is outside of the existing plastic. I created a pipe framing that covered the existing plastic, this will keep the layers separated. The pipe in the ceiling has a T in the middle of it to help give it a little bit of rigidity. Next I measured the plastic and rolled it out and cut it to length. Folding the plastic back on it's self so that it could easily be laid on top of the greenhouse and stretched out. After stretching it over the back I placed a few staples in it and then stretched it down the front edge. Coming to the back again I added a few more staples in the existing board that secures the plastic. Next I place a strip of wood so that it would secure the plastic to the board near the ground on the front for the greenhouse. After securing this I moved to the back and did the same and secured the plastic to the top board that also holds the pipes in place. Next I carefully worked the ends of the greenhouse so that the plastic was spaced away from the existing plastic. I believe that currently this is the weak link in my design. I'll have to come up with a better way to keep the two layers separated, but until then this should work. Hopefully I'll get some pictures posted soon of exactly how I did this. Until then let me know if you have any questions.

Here's how I put the double glazing on.
I nailed 3 - 1 3/4 thick boards along the length of the green house. One at the peak, front top edge and front near the ground. In each of these I drilled holes for a 1 inch pipe to set in. This is outside of the existing plastic. I created a pipe framing that covered the existing plastic, this will keep the layers separated. The pipe in the ceiling has a T in the middle of it to help give it a little bit of rigidity. Next I measured the plastic and rolled it out and cut it to length. Folding the plastic back on it's self so that it could easily be laid on top of the greenhouse and stretched out. After stretching it over the back I placed a few staples in it and then stretched it down the front edge. Coming to the back again I added a few more staples in the existing board that secures the plastic. Next I place a strip of wood so that it would secure the plastic to the board near the ground on the front for the greenhouse. After securing this I moved to the back and did the same and secured the plastic to the top board that also holds the pipes in place. Next I carefully worked the ends of the greenhouse so that the plastic was spaced away from the existing plastic. I believe that currently this is the weak link in my design. I'll have to come up with a better way to keep the two layers separated, but until then this should work. Hopefully I'll get some pictures posted soon of exactly how I did this. Until then let me know if you have any questions.
Tuesday, January 1, 2008
Lots of pictures
I was finally able to get out and get some pictures of "Greenhouse #2" before I put the second layer of glazing on.

 In the photo above the white piece of plywood leaning against the end is not part of the design, it just happens to be there. Behind the plywood is the plywood that is nailed to the wall.
The photo on the left is a view of the other end, this wall is facing due east.
The photo on the right is a closeup of the corner. I tried to round it with a router and chisel as much as possible to help relieve the pressure so that the plastic is less likely to rip.
 As you can see from these photos, one piece of plastic stretches from the front wall all the way over and part way down the back wall. The small white square in the upper left corner is where a vent will be installed. I was able to find some 20' wide plastic at Home Depot. I made it long enough, about (8'+16'+8'=) so that it could stretch down and cover the end walls. The left end wall was also remove and covered separately and reinstalled. The same could be done for the front wall if necessary but it would then be hard to secure the plastic to the front wall.


 Three quarter inch PVC pipe was used as the support members for the roof. They connect into the front wall with plumbers tape and are secured into some 1 1/8" holes that were drilled in the top of the wall.
As you can see from the photos on the left there were two different ways that I experimented with for securing the pipe to the all.
 Each of the PVC pipes are secured to a brace about half way up the roof line and that brace is attached to the back wall with another diagonal brace. Another one should be applied that goes the other direction but this one does a surprisingly good job by itself. The photo at the left shows how the pipe is attached to the main brace. You can also see from this photo that the walls are insulated with white foam.
The brace is attached on top of the pipe so that the metal tape doesn't chaff the plastic.
 Each of the walls are connected to each other with two bolts and t-nuts. Thus by removing 8 bolts the whole thing can come apart and be moved. I've moved each of the walls except for the back wall. It is probably getting a bit heavy since it is 16 feet long. Also the back wall has rebar that goes through the bottom of the wall to help keep it from going on a walk like the first one did.
Well that is enough rambling for now. I hope that the pictures help you better understand what I have accomplished so far.


 In the photo above the white piece of plywood leaning against the end is not part of the design, it just happens to be there. Behind the plywood is the plywood that is nailed to the wall.
The photo on the left is a view of the other end, this wall is facing due east.
The photo on the right is a closeup of the corner. I tried to round it with a router and chisel as much as possible to help relieve the pressure so that the plastic is less likely to rip.
 As you can see from these photos, one piece of plastic stretches from the front wall all the way over and part way down the back wall. The small white square in the upper left corner is where a vent will be installed. I was able to find some 20' wide plastic at Home Depot. I made it long enough, about (8'+16'+8'=) so that it could stretch down and cover the end walls. The left end wall was also remove and covered separately and reinstalled. The same could be done for the front wall if necessary but it would then be hard to secure the plastic to the front wall.

 Three quarter inch PVC pipe was used as the support members for the roof. They connect into the front wall with plumbers tape and are secured into some 1 1/8" holes that were drilled in the top of the wall.
As you can see from the photos on the left there were two different ways that I experimented with for securing the pipe to the all.
 Each of the PVC pipes are secured to a brace about half way up the roof line and that brace is attached to the back wall with another diagonal brace. Another one should be applied that goes the other direction but this one does a surprisingly good job by itself. The photo at the left shows how the pipe is attached to the main brace. You can also see from this photo that the walls are insulated with white foam.
The brace is attached on top of the pipe so that the metal tape doesn't chaff the plastic.
 Each of the walls are connected to each other with two bolts and t-nuts. Thus by removing 8 bolts the whole thing can come apart and be moved. I've moved each of the walls except for the back wall. It is probably getting a bit heavy since it is 16 feet long. Also the back wall has rebar that goes through the bottom of the wall to help keep it from going on a walk like the first one did.
Well that is enough rambling for now. I hope that the pictures help you better understand what I have accomplished so far.
Saturday, December 29, 2007
Twin Wall Planning
Well I decided to plant my first seeds yesterday. Looking at the temperatures for different plants I decided to just see if I could get some herb's started since it is still 20-30F outside. I'll just grow them inside until I can get the greenhouse to warm up. Speaking of the greenhouse I finally figured out a way to add an extra layer. I'm going to build a pipe structure over the top and attach it to the back wall since I can accomplish that with one piece of glazing plastic. I'm trying to get 1 1/2 inch of space between the layers of plastic glazing since that is what I have read is the optimal spacing. At this time the plan is to use 45 degree elbows, 4-way joints, and redwood strips to build the frame for this second layer. I'll post pictures as soon as I get it done. I'm curious to see what this combined with a wall of water will do for the ground temperature inside a wall of water.
Sunday, December 16, 2007
Getting ready for an early spring
I don't know what the weather will do but I am hoping to have an early spring inside of my greenhouse. My goal is to start my seeds in the house on January 2nd. I'm thinking that by the time they are ready to plant I will be able to have the greenhouse warm enough for them. I believe I've figured out a way to cheaply make a double wall of plastic. If I place a grid of 1 1/2" pipe over the current layer and then fasten it down and cover it with a second layer. I should be able to gain some insulation value with minimal expense. I'm also planning on making an insulated door. I'm hoping to do this with my father over Christmas break.
Since I last updated this blog I was able to finish insulating the end wall but I haven't sealed it with foam yet. I did move in some compost, it still needs to be mixed in with the rest of the dirt, and clean up the old plants. The garlic and onions were still grown last time I worked out there but I haven't checked them lately.
Since I last updated this blog I was able to finish insulating the end wall but I haven't sealed it with foam yet. I did move in some compost, it still needs to be mixed in with the rest of the dirt, and clean up the old plants. The garlic and onions were still grown last time I worked out there but I haven't checked them lately.
Tuesday, November 6, 2007
Effects of the fan, insulation, & more
Unfortunately I forgot to turn on the rollover feature of my thermacron so the data never got recorded. In the mean time I was able to pickup some 2 inch foam insulation from HomeDepot, which was cheaper than Lowes. Last night I was able to install the insulation in the back wall. The plan is to fill in the cracks with the spray foam to seal it up really good but I want to get all of the pieces in first so that I don't waste the can of foam. I'm planning on insulating the end wall Wednesday night and hopefully sealing it up on Sunday. I'm also hoping to be able to make an insulated door on Sunday which should really help seal things up.
Until then I've stuck a small utility heater in there that is rated at 1300w. It is set on the lowest setting and is on a timer that turns on and off every half hour during the night so that I'm sure it will not run to much. The heater blows onto the fan which blows onto the plants. Hopefully this will help keep them warm and happy, but not scorched. It seemed to work well yesterday. I'm hoping to post the temperature data from that on Wednesday night.
I've also purchased two dark green 30 gallon trash cans that I plan on putting water in to help collect heat during the day.
Until then I've stuck a small utility heater in there that is rated at 1300w. It is set on the lowest setting and is on a timer that turns on and off every half hour during the night so that I'm sure it will not run to much. The heater blows onto the fan which blows onto the plants. Hopefully this will help keep them warm and happy, but not scorched. It seemed to work well yesterday. I'm hoping to post the temperature data from that on Wednesday night.
I've also purchased two dark green 30 gallon trash cans that I plan on putting water in to help collect heat during the day.
Wednesday, October 31, 2007
Effects of a Fan & Heating
My plants haven't looked all that great lately so I'm going to try and increase the circulation by placing a small wig-wag fan at the base of my tomato plants near the 60w light bulb. I did this at about 8:00am this morning. I'm hoping to post the results tomorrow or at the latest next Sunday. Also I'm wanting to paint the heat pipes black and insulate the back wall on Sunday to see if I can increase the daytime temperature and temperature storage capacity.
Tuesday, October 30, 2007
60w Greenhouse Heater
After doing a little bit of research on my electric bill I determined that it will cost me about $0.02 per day to heat my greenhouse with a $60 bulb running twenty-four hours a day. This seems reasonable. I know that it will not provide very much heat but I'm just looking at extending the season not trying to make it all the way through winter.
Here are the results from each 24hr period.
Conclusion:
It appears that the light was able to produce enough heat to keep the temperature from dropping all of the way in the evening but it didn't appear to make that much difference during the day. Also the days have been warmer so it is also harder to tell the difference. The 28th was warmer overall but it wasn't as sunny as you can tell by the lack of difference in temperature during the late afternoon.
I need to get some more tests because there are still to many variables involved. Such as the tiny hole that needs patched, sealing the door, etc.... So until I can get those items taken care of I will continue to record the information and share it.
Here are the results from each 24hr period.
| Date | Outside | Inside | Difference |
| October 27: | 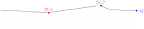 | 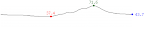 |  |
| October 28: |  | 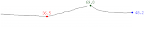 |  |
| October 29: |  |  | 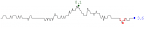 |
Conclusion:
It appears that the light was able to produce enough heat to keep the temperature from dropping all of the way in the evening but it didn't appear to make that much difference during the day. Also the days have been warmer so it is also harder to tell the difference. The 28th was warmer overall but it wasn't as sunny as you can tell by the lack of difference in temperature during the late afternoon.
I need to get some more tests because there are still to many variables involved. Such as the tiny hole that needs patched, sealing the door, etc.... So until I can get those items taken care of I will continue to record the information and share it.
Sunday, October 28, 2007
Initial Temperature Recordings
This weekend I was able to get a baseline set of temperatures recorded from my greenhouse. The weather yesterday was sunny with very little wind if any. The temperatures that I was able to record are shown in the graph below. All temperatures are in Fahrenheit and recorded ever 5 minutes using a thermochron. The inside and outside temperature were measured just above ground level in the shade.

Time span: Friday Oct 26 @ 6:00pm - Sunday Oct 28 @11:00am
Conclusion
This design will warm up but will not hold the heat through the night. In my previous greenhouse I used some 5-gallon buckets to help hold the heat and lightly insulated the back wall and was able to get a temperature positive difference to hold through the night when I put heated water inside the buckets.
What's next
I'm going to try and put an 100watt incandescent light bulb on a timer to come on at a certain time to see how much it can effect the temperature. Also as soon as possible I will be insulating the back wall and patching the small hole in the plastic in the ceiling (manufacturing defect).

Time span: Friday Oct 26 @ 6:00pm - Sunday Oct 28 @11:00am
| Outside | ||
| Maximum | 52.7 | |
| Minimum | 35.6 | |
| Inside | ||
| Maximum | 71.6 | |
| Minimum | 36.5 | |
| Difference | ||
| Maximum | 18.9 | |
| Minimum | -0.9 | |
Conclusion
This design will warm up but will not hold the heat through the night. In my previous greenhouse I used some 5-gallon buckets to help hold the heat and lightly insulated the back wall and was able to get a temperature positive difference to hold through the night when I put heated water inside the buckets.
What's next
I'm going to try and put an 100watt incandescent light bulb on a timer to come on at a certain time to see how much it can effect the temperature. Also as soon as possible I will be insulating the back wall and patching the small hole in the plastic in the ceiling (manufacturing defect).
Monday, October 22, 2007
Greenhouse #2 revised
I've done quite a bit of research on better materials to use and decided that I really like Solexx. The only problem is that I haven't figured out a good way to create the roof and have it still be portable. I could screw it to some trusses but then trying to put it back together would be a nightmare. I would like to at least cover the sides with Solexx because they could still be portable.
While roaming Home Depot again the other day I found some construction plastic that was 20' wide. This would work a lot better than the 10' wide stuff I used last spring. It wasn't that expensive so I figured I would give it another try and see if it makes it through the winter. This time I made sure to leave the plastic about 8' long on each end. It turned out really nice because I was able to stretch the plastic all the way from underneath the front wall over the top and way down the back wall. The ends even turned out really nice.
It is a little later than I wanted to cover this but I think I can still get another month out of the tomato plants in their and maybe even a crop of lettuce.
While roaming Home Depot again the other day I found some construction plastic that was 20' wide. This would work a lot better than the 10' wide stuff I used last spring. It wasn't that expensive so I figured I would give it another try and see if it makes it through the winter. This time I made sure to leave the plastic about 8' long on each end. It turned out really nice because I was able to stretch the plastic all the way from underneath the front wall over the top and way down the back wall. The ends even turned out really nice.
It is a little later than I wanted to cover this but I think I can still get another month out of the tomato plants in their and maybe even a crop of lettuce.
Sunday, July 22, 2007
Greenhouse #2
After the last greenhouse went for a walk I decided that this time I should make it a little bit bigger. My Internet research showed that a larger greenhouse would work better because of it's thermal capacity. This time I decided to make it 8' wide x 16' long by 8' tall. The last one was a little cramped so this would actually give me some room to move around inside. This spring (2007) the weather finally turned nice enough that I could make a nice level spot for it.
Taking into consideration that I may be moving some day I wanted to keep my design as portable as possible. I decided to bolt the walls together so that they could easily come apart. The 8x16 back wall is a bit on the large side but it's still manageable with a couple of people. I liked the solid back wall design of my last greenhouse so I decided to keep that basic design. This time I thought I would try curved roof though. After a couple of days I got it all put together and planted. My goals were to try and get two growing seasons spring-summer and summer-winter. I wasn't able to plant very early this time because the ground hadn't warmed up very well.
I did manage to get a crop of radishes, turnips, and lettuce before I took of on my summer adventures. The problem was that during my summer adventures it got a little hot and baked the plastic covering, which was just construction plastic from Home Depot. When wind started blowing it just shattered and made a lovely mess of the yard. I guess I need more ventilation next time. Since August and September are pretty warm I decided to just leave the covering off and let the two solid walls protect the plants from excess wind.
Back to the drawing board for a new and improved design.
Taking into consideration that I may be moving some day I wanted to keep my design as portable as possible. I decided to bolt the walls together so that they could easily come apart. The 8x16 back wall is a bit on the large side but it's still manageable with a couple of people. I liked the solid back wall design of my last greenhouse so I decided to keep that basic design. This time I thought I would try curved roof though. After a couple of days I got it all put together and planted. My goals were to try and get two growing seasons spring-summer and summer-winter. I wasn't able to plant very early this time because the ground hadn't warmed up very well.
I did manage to get a crop of radishes, turnips, and lettuce before I took of on my summer adventures. The problem was that during my summer adventures it got a little hot and baked the plastic covering, which was just construction plastic from Home Depot. When wind started blowing it just shattered and made a lovely mess of the yard. I guess I need more ventilation next time. Since August and September are pretty warm I decided to just leave the covering off and let the two solid walls protect the plants from excess wind.
Back to the drawing board for a new and improved design.
Subscribe to:
Posts (Atom)